Before you dive in, make sure you'll start 2026 the right way. Track your new year resolutions in style, with the right tool. I built addTaskManager exactly for this, but you can use it to track finances, habits, anything.
Writing an ebook could be a lot of fun. Not to mention the fact that by writing something you’re spreading value directly and you can receive a lot of direct compensation. If you chose to sell your ebook chances are that you will make some money. Sometimes a lot of money. And if you chose to give it away for free, it’s a sure bet that you’ll make a lot of new friends. Either way, it’s a win.
But writing an ebook can be sometimes overwhelming. I’m not talking about the actual writing process, choosing the topics, putting the chapters together or the main ebook subject. I’m talking about the invisible scaffold, the physical setup for managing, maintaining and organizing your work. Sometimes you don’t remember what you wrote yesterday, or your ideas are coming too fast and you don’t have the time or the habit to write them down, or you don’t have a place with the last version of ebook and have to compile it every time you distribute it.
In today’s post I’ll share with you my setup for writing an ebook. It’s a system based on my favorite journaling application, and that would be MacJournal, of course. I’ve already wrote some articles about enhancing MacJournal, like power blogging with MacJournal, GTD style, or how to create a habit in 15 days, feel free to check them out before starting to read this one.
Writing An Ebook
I’m not going to talk about how you can chose you ebook subjects, because the options here are endless. You can write an ebook about gardening, an ebook about dating, an ebook about cooking, about programming, about business, about self-improvement (that would be my case, by the way) the sky really is the limit. I am going to talk about what your physical steps are in creating an ebook, what exactly are you going to do, step by step.
For start, your ebook will contain sections, or chapters. The main creation process involve writing those chapters which are forming the main product. Yeap, I know you know that, just saying. You usually have a plan for that, either in form of a list, either as a mind map. You also establish a writing speed and a certain volume of writing each day. This is the main work.
But if you’re writing an ebook, you must already have a blog in which you can talk about that. If you’re writing an ebook and don’t have a blog yet, I highly encourage you to create one ASAP. It’s not very difficult, and it’s good for your writing habits. So, besides from writing your actual ebook, you’ll have also to write some blog posts about it. To announce your ebook to your potential audience, to share progress or to call for opinions.
Apart from that, you will promote your ebook and you’ll do that by writing various pieces of text, most often landing pages for all your promotion channels.
And in the process, you may have some ideas about the ebook, about the blog, about promoting or about anything else. I often found out that committing myself to a medium term project like an ebook opened the door to a bunch of new ideas.
And of course you will do a lot of research also, usually grouped into notes.
So, to keep a long story short, your ebook will consist on:
- chapters
- blog posts (including landing pages)
- ideas
- notes
Introducing MacJournal
MacJournal is a great application for journaling and blogging. With a little bit of hacking it can be a killer application for blogging, as I already wrote. But in its default setup is a little bit too simple for writing an ebook.
When I decided to write some ebooks (and that would be several weeks ago) I turned to another fantastic piece of software from Mariner, StoryMill . StoryMill is a tool for writing fiction material, very close to writing movies scripts, including characters and scenes. It’s not a surprise that Mariner launched something so close to script writing since they are also owning Contour, one of the best tools for writing actual movie scripts. But it was too complicated for an ebook. Great for a novel, but an ebook is usually less than a novel.
So, I decided to make some tweaks to my MacJournal setup and come up with something a little bit more complex than a MacJournal vanilla setup but less complicated than a full blown StoryMill installation. I made use of MacJournal tagging capabilities, entry attributes like status and label, and of course, smart journals. At the end of the post you’ll also be able to download a template containing all the modifications described here.
Writing An Ebook The Smart Way
Well, enough with talking, let’s do some work. Here’s how you can create a setup for writing an ebook similar to the one I use right now.
The Main Journal
First and foremost, I created a new journal in MacJournal and named it after my future ebook. In this post, I’ll use a MacJournal template for an ebook called “7 Things”. It’s an example ebook which contains all that I’ve learned from my daughter, each year. She’s 3 now, so I will have 3 chapters. This journal will hold all the necessary information for my ebook, acting like a main repository.
After that, I established a little routine for writing stuff in this journal. Nothing complicated: each time I add an entry in this journal I tag it using the Inspector window. And this is where the power of this setup actually is, in the tagging area. If the entry is a chapter of my ebook I add a tag “book chapter”. If the entry is an idea, I add to that entry the tag “ideas”. If the entry is just a research note, I tag it “notes”. I think you got the idea. Exactly, when I write some blog post, I tag it “blog”. Tagging your posts is a great habit anyway, regardless of the fact that you’re writing an ebook or not.
Another important habit is to keep a close reference of your entry status. Using the Inspector make sure you assess each time after you finished writing something the status of it. Mac Journal offers 5 statuses for your entries: Unknown, Not Started, Underway, Needs Review and Completed. Most of the time I’m in the “Needs Review” status. When I finished a chapter I assign it the status: “Completed”. You’ll see later why this is important.
I also put in this journal every other support text, like blog posts, ideas, landing pages and if I need to do some research I also add notes. All in the format of a journal entry, with a topic title and body.
Like this, every available text for my ebook is in one place, under one journal. It’s very convenient and help me speed up the creating process. Of course, if I keep adding chapters and notes and blog posts the journal will soon become cluttered. Putting together notes, ideas, chapters and blog posts can create a little bit of chaos.
Using Smart Journals
Smart journals to the rescue! In order to keep the various parts of this ebook separated and have a clear vision of what’s in every section at every given moment, I created several smart journals.
In MacJournal, a smart journal is a special type of journal which can be constructed on the fly from the parent journal, using some filters. It’s extremely powerful, because it can use a large variety of filters: from topic titles to entry statuses and ratings. With a smart journal you can extract from a main journal pretty much anything you want.
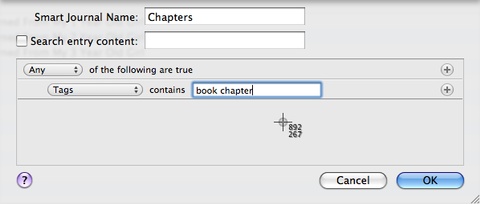
So, I created 5 smart journals: Chapters, Blog, Notes, Ideas and Master. In order to create a smart journal option-click the main journal and chose “New Smart Journal”. A pop-up window will appear containing a filter panel. Here’s how the chapter filtering panel looks like.

The filter states that each entry tagged “book chapter” will appear in this smart journal. Any other entries will be ignored. Now I have a special journal in which I have all the chapters on my book, separated from the rest of the writing material. Good. I can focus.
I can create another smart journal for ideas, extracting only the entries tagged with “ideas”:

and so on. For Blog and Notes smart journals the setup is identical, except the tags are “blog” and “notes” of course. Now you understand why is so important to tag your entries. If an entry is not tagged it will not appear in the smart journal. It will still be available in the main journal, though.
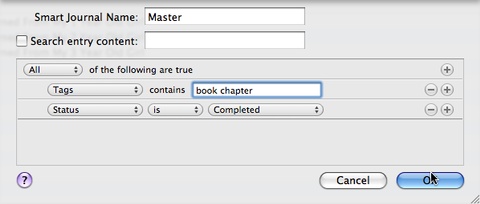
Now, I needed a way to assess my progress, so I created another smart journal, with different filters. This journal is called “Master” and is the journal which will contain all the finished chapters of the ebook. In order to have all the chapter all I have to do is to add a filter using the “Tags” option, matching the tag “book chapters”. We’ve done this before, in the “Chapters” smart journal.
But in order to have only the finished chapters, I will add another filter, using the “Status” option, matching the key “Completed”. Like this, only the book chapters with the status set to “Completed” will appear in the Master smart journal. Believe me, that’s a really great option to assess your progress.

In the test template used for this blog there are only 3 chapters, but if you’re writing an ebook with 20 chapters you’ll find this smart journal extremely useful. You will actually see how much you’ve done so far and you’ll be able to fine tune it. If you think a chapter still needs some touches, change its status to “Needs Review” and it will automatically disappear from the Master journal.
Exporting Your Ebook
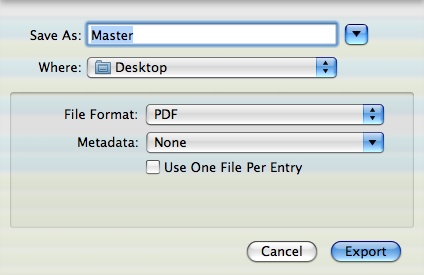
After you finished it you may want to export your book from MacJournal. Either for packing it in a PDF format, either for some final touches in another word editor of your choice. In order to export your ebook, option click the “Master” smart journal and chose “Export…”. In the next window you can chose from various formats: word, html or PDF. You can also chose which meatdata (titles, date, etc) will appear on the export.

You’re done!
I've been location independent for 15 years
And I'm sharing my blueprint for free. The no-fluff, no butterflies location independence framework that actually works.
Plus: weekly insights on productivity, financial resilience, and meaningful relationships.
Free. As in free beer.
